
| 일 | 월 | 화 | 수 | 목 | 금 | 토 |
|---|---|---|---|---|---|---|
| 1 | 2 | |||||
| 3 | 4 | 5 | 6 | 7 | 8 | 9 |
| 10 | 11 | 12 | 13 | 14 | 15 | 16 |
| 17 | 18 | 19 | 20 | 21 | 22 | 23 |
| 24 | 25 | 26 | 27 | 28 | 29 | 30 |
- 리액트
- CORS
- 프로그래머스
- Reducer
- array
- 자바스크립트
- react
- 타입스크립트
- JS
- 비트 연산자
- Redux
- axios
- firebase
- 파이어베이스
- 프리온보딩
- localstorage
- v9
- til
- 알고리즘
- Component
- 브라우저
- 원티드
- TypeScript
- 컴포넌트
- JavaScript
- es6
- 프론트엔드
- state
- Frontend
- react localStorage
- Today
- Total
도리쓰에러쓰
[React] styled-components를 이용한 class없는 CSS 스타일링 본문
저번 게시물에 이어서 작성하겠습니다. (코드 참고)
[React] React Router 3 :: URL 파라미터로 상세페이지 100개 만들기
저번 게시물에 이어서 작성해보겠습니다. (코드 참고) [React] React Router 2 :: Link, History, Switch 기능 저번 게시물에 이어서 작성해보겠습니다. (저번 게시물 코드 참고) [React] React Router 1 :: 세팅..
dori-coding.tistory.com
1. 'style-components' 라이브러리를 사용하는 이유
Component를 만들다보면 CSS가 많아지고, 실수로 class명을 중복으로 선언하여 CSS도 겹칠 수가 있는데 이를 방지하기 위해 'style-components' 라이브러리는 class 선언 없이 Component에 CSS를 직접 장착할 수 있습니다. (CSS in JS라고도 합니다.)
2. 'style-components' 라이브러리 사용법
1) 터미널에 npm install styled-components 혹은 yarn add styled-components(yarn 있는 사람만)를 작성하여 라이브러리를 설치합니다.
2) Detail.js에 'style-components' 라이브러리를 import합니다.
import styled from 'styled-components';
3) Box라는 Component를 하나 생성합니다.
* let 컴포넌트명 = styled.태그` CSS Code `;
* 백틱(`) 사용하기!
let Box = styled.div`
    padding : 20px;
`;
4) <Box /> Component를 작성하면 다음과 같이 적용되는 것을 확인할 수 있습니다.
<div className='container'>
    <Box />
    <div className='row'>
        <div className='col-md-6'>
            <img className='img' src={ process.env.PUBLIC_URL + '/images/img'+ (Number(findProduct.id) + 1)+'.jpg' } />
        </div>
        <div className='col-md-6 mt-4'>
            <h4 className='pt-5'>{ findProduct.title }</h4>
            <p>{ findProduct.content }</p>
            <p>{ findProduct.price }</p>
            <button className='btn btn-danger'>주문하기</button>
            <br />
            <br />
            <button className='btn btn-danger' onClick={ () => {
                history.goBack();
            }}>뒤로가기</button>
        </div>
    </div>
</div>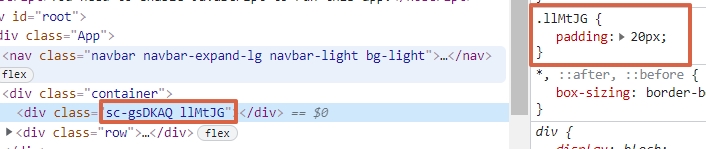
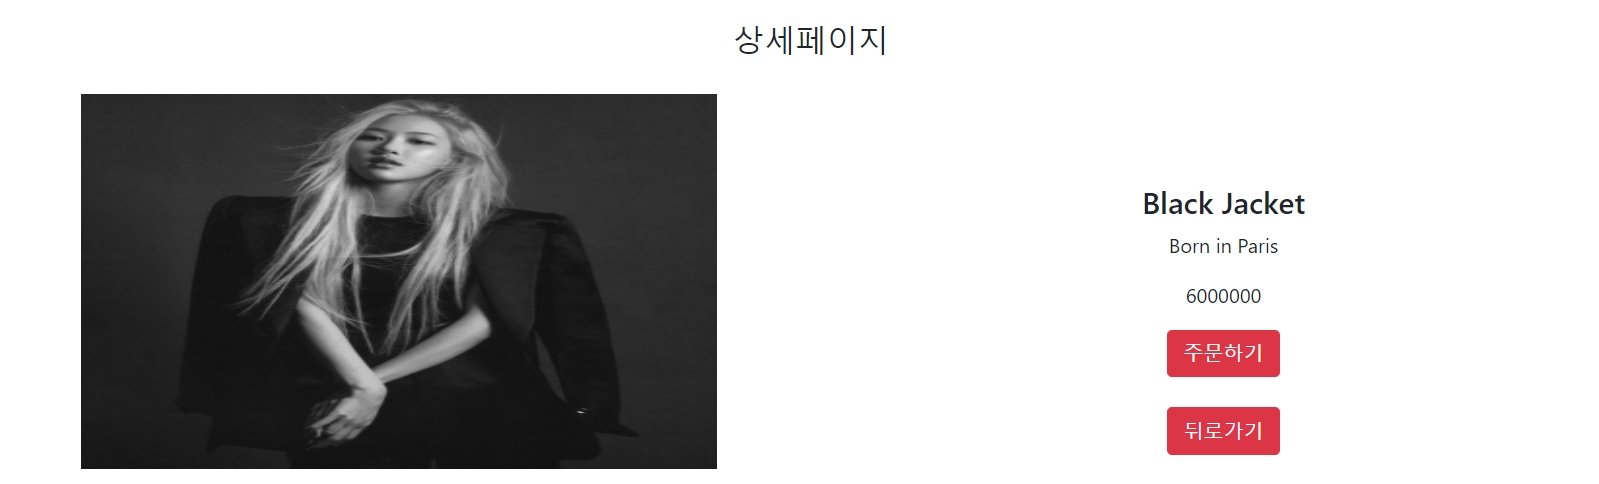
📌 Component 안에 Component 사용 또한 가능합니다 !
- 우선, Title이란 Component 선언합니다.
let Title = styled.h4`
    font-size : 25px;
`;
- Box Component 안에 Title Component를 작성합니다.
<Box>
    <Title>상세페이지</Title>
</Box>
- 그럼 다음과 같이 CSS가 적용된 것을 확인할 수 있습니다.
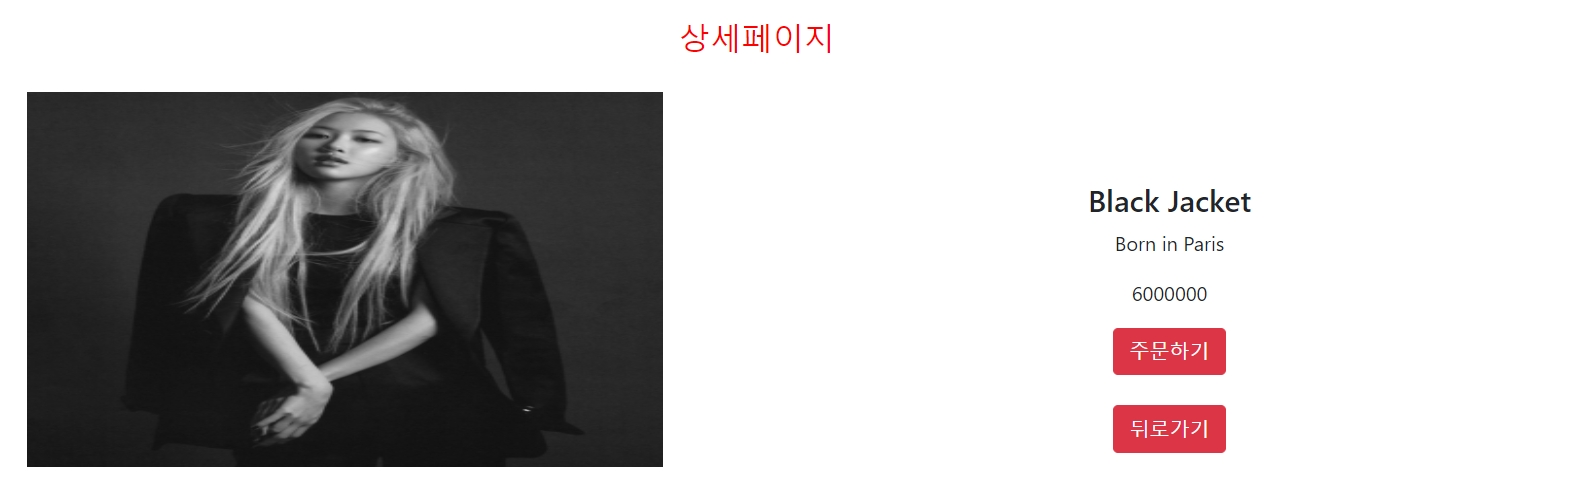
📌 비슷한 UI가 필요한 경우는?
- Title Component 안에 color 값을 다음과 같이 추가합니다.
* ${} : 백틱(`) 안에서 사용할 수 있는 JavaScript 문법
let Title = styled.h4`
    font-size : 25px;
    color : ${ props => props.color }
`;
- props를 통해 값을 전달합니다.
* props 문법 : 1️⃣ 보낼이름={변수명} 2️⃣ 보낼이름="일반문자"
<Box>
    <Title color="red">상세페이지</Title>
</Box>
- 다음과 같이 '상세페이지'가 빨간색으로 바뀐 것을 확인할 수 있습니다.
3. 전체 코드
Detail.js
import React, { useState } from 'react';
import { useHistory, useParams } from 'react-router-dom';
import styled from 'styled-components';

let Box = styled.div`
    padding : 20px;
`;

let Title = styled.h4`
    font-size : 25px;
    color : ${ props => props.color }
`;

function Detail(props) {

    let { id } = useParams();
    let history = useHistory();
    let findProduct = props.products.find(function(product) {
        return product.id = id;
    });

    return(
        <div className='container'>
            <Box>
                <Title color="red">상세페이지</Title>
            </Box>
            <div className='row'>
                <div className='col-md-6'>
                    <img className='img' src={ process.env.PUBLIC_URL + '/images/img'+ (Number(findProduct.id) + 1)+'.jpg' } />
                </div>
                <div className='col-md-6 mt-4'>
                    <h4 className='pt-5'>{ findProduct.title }</h4>
                    <p>{ findProduct.content }</p>
                    <p>{ findProduct.price }</p>
                    <button className='btn btn-danger'>주문하기</button>
                    <br />
                    <br />
                    <button className='btn btn-danger' onClick={ () => {
                        history.goBack();
                    }}>뒤로가기</button>
                </div>
            </div>
        </div>
    )
}

export default Detail;
* 이외의 코드는 이전 게시물에 작성된 코드와 일치합니다.
'코딩애플 (React) > 기초수업 (코딩애플) - 2' 카테고리의 다른 글
| [React] Lifecycle Hook(예전 문법) vs useEffect(요즘 문법) (0) | 2022.01.18 |
|---|---|
| [React] SASS 개념, 설치 및 기본 문법 (0) | 2022.01.17 |
| [React] React Router 3 :: URL 파라미터로 상세페이지 100개 만들기 (0) | 2022.01.12 |
| [React] React Router 2 :: Link, History, Switch 기능 (0) | 2022.01.11 |
| [React] React Router 1 :: 세팅과 기본 라우팅 (0) | 2022.01.11 |